
Introduction
Mercury is a small 2-motor, light-seeking BEAM photovore. It was based from our dear friend, Wilf Rigter's "single AC/HC240 reversing photovore". The original circuit is fairly simple to build, with few components needed. But my version of this bot has a little bit of an "attitude" (well, kind of).
Anyways, I named this bot Mercury because, the planet Mercury is the closest planet to the sun (the most nearest to the light source, the sun). And also, it's the color of a mercury, silver or chrome. Well, I guess you get my point. This is why I named it Mercury. Does it makes sense? Well, at least something like that.
Scraps make for good BEAM parts! Metal scraps can be found in several places like junk yards or in pod storage units that are no longer being used. Even old ABF UPack pod storage units themselves can be broken down and used as scraps. This bot was constructed from metal scraps and parts from old and disected Sony Playstation units. Well, it really took me weeks and long hours EVERY SINGLE DAY, just to make the circuit to work what I wanted including the whole construction. Whew, finally! :-)
Behavior
Ok, Mercury's behavior is quite simple. When the power is turned ON, it moves forward in a small quick zig-zag direction. If there's light available in its path or area, it moves towards it and wanders around it, just like he owns the light. But after several seconds, Mercury will stop for a few seconds (like resting or catching its breath), and it continues to move again, chasing the light like crazy.
Mercury will also turn ON its 2 small red LED's if it detects darkness. The red LED's are mounted in front of it, below its eye sensors. In the dark, Mercury looks like a hungry red-eyed predator, especially when it's in a "stop" mode, waiting for a kill...I mean a light. The reason why I added this feature is because, so that people or a person could easily notice and hopefully avoids from stepping on it. So, this type of bot should really be placed in a safe area or build an RJP (Robot's Jurassic Park). And also, these red LED lights on Mercury makes him look cool.
And by the way, the original circuit comes with only 1 tactile sensor, that reverses both motors if it hits something (pretty cool to watch). I revised this circuit, making it into 2 tactile sensors (left and right) that works effectively. I did so much experimentations on this. You'll notice that I added some components in the schematic as shown below, which took me several days just to make it to work using 2 sensors. In this way, the bot could easily use 2 individual sensors in bright or dark areas. But without this additional components and a little mods, the bot's sensors are useless in bright conditions (I'm talking about using 2 individual sensors using the original diagram). So, if one of it's sensor is triggered, the bot would just stop (not moving at all) in bright condition. But if it's in a dark place, the sensors works well. Anyway, if you really just like it fairly simple and wants a "cutee" behavior, try the original circuit (as shown below), created by Wilf Rigter. But for an advanced builder, you can try my version. Just feel free to use it......experiment......and have lots of fun!!! Thanks Wilf for the original circuit!
P.S. If you're having trouble using 2 individual sensors as shown in my drawing, just use the original configurations on Wilf's circuit. In fact, the original circuit is much more simple and effective. Goodluck!
Schematic Diagrams
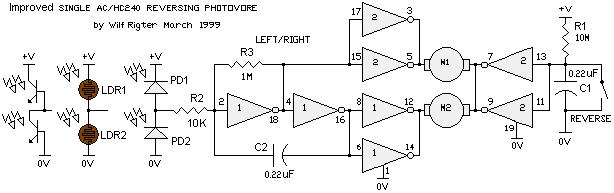
The original circuit by Wilf Rigter
For the circuit explanations, please click the link below.
Link : http://junkbots.solarbotics.com/library/circuits/bot_popper_240.html - broken link
Or try this link: http://www.solarbotics.net/library/circuits/bot_popper_240.html

Revised circuit by me (click to enlarge)
I also included 2 additional circuits used by Mercury. One is for dark sensor and the other is for the "stop and go" behavior. Many thanks to Solarbotics (Dave H.) for sharing this neat "stop and go" circuit, used by Scoutwalker 2.2 with sunseeker BEAM bot.
Images
(click any to enlarge)


P.S. I've used Quick Drying Lacquer Spray (Acrylic Epoxy) to most of the bot's parts, to make it glossy (finishing clear spray paint).
The Construction
(click any to enlarge)


Video Clips
1. Chasing the light (flashlight) (2.58 MB)
2. Showing off its "stop and go" feature as well as its dark activated lights (7.40 MB)
3. T-maze - going to the right side (3.48 MB) NEW!
4. T-maze - going to the left side (3.34 MB) NEW!
5. T-maze - another starting position, take 1 (4.58 MB) NEW!
6. T-maze - another starting position, take 2 (2.51 MB) NEW!
...maybe more to come!
E-mail me at : hetfield9999@yahoo.com
I'm also in the Yahoo BEAM Group (membership required, it's free!)
Copyright 2007 by : Harold R. Ilano
B.E.A.M. Patents by : Mark W. Tilden
- All Rights Reserved -
Visitors since July 16, 2007